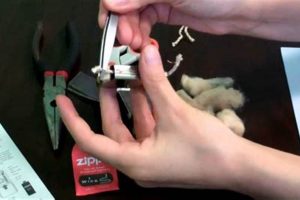
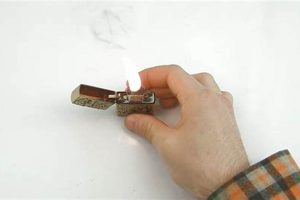
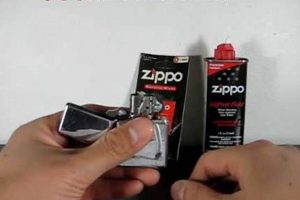
Optimizing a Zippo lighter’s flame involves manipulating the length of its cotton wick, typically accessed by removing the insert unit from the lighter casing. This process often utilizes a small tool, such as tweezers or a needle-nose pliers, to carefully pull the wick upward or push it downward, depending on the desired flame height.
A properly adjusted wick is essential for optimal lighter performance. It directly impacts fuel efficiency, preventing excessive fuel consumption and soot buildup. This, in turn, extends the lighter’s lifespan and ensures a clean, reliable flame for consistent ignition. Since the lighter’s introduction in the 1930s, wick adjustment has been a key aspect of its maintenance, contributing to its enduring popularity as a dependable and refillable lighter.
The following sections will detail the steps involved in safely and effectively managing a Zippo lighter’s wick length, covering necessary tools, safety precautions, and troubleshooting common issues.
Tips for Zippo Wick Adjustment
Proper wick maintenance is crucial for optimal lighter function. These tips provide guidance for achieving a consistent and reliable flame.
Tip 1: Work on a Clean Surface: Performing adjustments over a clean, uncluttered area prevents the loss of small components and keeps the lighter free of debris.
Tip 2: Use the Right Tool: Employing tweezers or needle-nose pliers provides precise control over the wick, minimizing damage and ensuring accurate adjustments.
Tip 3: Remove the Insert: The insert must be extracted from the casing before any wick manipulation takes place to avoid damage to the lighter and allow full access to the wick.
Tip 4: Gentle Adjustments: The wick should be moved gradually, avoiding excessive pulling or pushing, which could damage the wick or disrupt the lighter’s mechanism. Small adjustments are key.
Tip 5: Test the Flame: After each adjustment, the lighter should be tested to observe the flame height and ensure optimal performance. Repeat the process until the desired flame is achieved.
Tip 6: Trim the Wick: If the wick becomes excessively charred or frayed, carefully trim the end with small scissors, ensuring a clean, even cut. Avoid cutting the wick too short.
Tip 7: Address Flint Binding: If the flint wheel binds after adjusting the wick, the wick may be packed too tightly. Gently loosen the wick near the flint wheel.
Following these tips ensures a clean, efficient burn, extends the lighter’s life, and maximizes fuel efficiency. A correctly adjusted wick is fundamental to reliable and consistent lighter performance.
By understanding the importance of proper wick maintenance and following these practical guidelines, users can ensure their Zippo lighter provides years of dependable service.
1. Remove the Insert
Accessing and adjusting the wick on a Zippo lighter necessitates removal of the insert unit from the outer casing. This crucial initial step allows for unobstructed access to the wick, which sits within the chimney of the insert. Without removing the insert, the wick remains inaccessible, preventing any adjustment. The insert acts as a housing for the lighter’s internal components, protecting them while providing a platform for proper functionality. Attempting to adjust the wick without removing the insert could damage the wick, the flint wheel mechanism, or other internal parts.
Consider a scenario where the flame is too low. One might be tempted to try and manipulate the wick through the small openings in the chimney. However, this approach risks damaging the wick, leading to uneven burning or even rendering the lighter unusable. Properly removing the insert, however, provides clear access to the wick, allowing for precise adjustments with the appropriate tools. This ensures the wick can be raised or lowered effectively, optimizing the flame height and preventing further complications.
Removing the insert is fundamental to wick adjustment. This essential first step ensures safe and effective manipulation of the wick, preventing potential damage to the lighter’s internal components. Understanding this process is paramount for proper lighter maintenance and achieving optimal flame performance. This step lays the foundation for successful wick adjustment and contributes significantly to the longevity and reliability of the lighter.
2. Use Tweezers or Pliers
Precise manipulation of the wick within a Zippo lighter requires appropriate tools. Tweezers or needle-nose pliers are essential for this task, offering the necessary grip and control to avoid damage. These tools facilitate accurate adjustments, ensuring the wick is neither excessively pulled nor compressed, thus preserving its integrity and optimizing lighter function. Selecting the correct tool is paramount for achieving a consistent flame height and minimizing the risk of damage to the wick or surrounding components.
- Precision and Control
Tweezers and needle-nose pliers offer fine control over the wick, allowing for minute adjustments. This level of precision is crucial for achieving the desired flame height. For example, a slight upward movement of the wick can address a low flame, while a gentle downward push can correct a flame that is too high. The delicate nature of the wick necessitates a tool capable of such fine movements. Improper tools, such as fingers or sharp objects, can damage the wick, leading to uneven burning or complete failure.
- Grip and Stability
The small size and delicate nature of the wick necessitate a secure grip during adjustments. Tweezers and pliers provide this secure hold, preventing slippage and ensuring accurate positioning. This secure grip minimizes the risk of accidentally severing or distorting the wick. Attempting to adjust the wick without a proper gripping tool can result in frustration and potential damage to the lighter’s internal mechanism.
- Material Considerations
The material composition of the tweezers or pliers is also important. Stainless steel tools are ideal due to their durability and resistance to corrosion from the lighter fluid. This ensures the tool remains functional over time and does not introduce contaminants into the lighter’s fuel system. Using tools made of less durable materials might result in breakage or corrosion, potentially affecting the lighter’s performance.
- Safety and Prevention of Damage
Using the correct tools is paramount for preventing damage to the wick, the flint wheel mechanism, and surrounding components. Attempting adjustments with improper tools risks bending, breaking, or misaligning crucial parts of the lighter. This careful approach safeguards the lighter’s longevity and ensures continued reliable operation. Furthermore, using the correct tool minimizes the risk of injury during the adjustment process.
Employing tweezers or needle-nose pliers directly impacts the effectiveness and safety of wick adjustments. These tools facilitate precise control, secure grip, and minimize the potential for damage. Their proper use is integral to achieving a consistent, reliable flame and extending the lifespan of the Zippo lighter. Selecting and utilizing the appropriate tools is a crucial aspect of maintaining optimal lighter function.
3. Gently Raise or Lower Wick
Flame height in a Zippo lighter is directly controlled by the length of the exposed wick. “Gently raise or lower wick” encapsulates the core process of wick adjustment, impacting fuel consumption, flame stability, and overall lighter performance. This precise manipulation is crucial for achieving the desired flame characteristics and ensuring the longevity of the lighter.
- Flame Height Control
Raising the wick increases flame height, while lowering it reduces the flame. This direct correlation allows for fine-tuning based on individual needs and environmental conditions. A higher flame might be necessary in windy conditions, whereas a lower flame is preferable for tasks requiring precision, such as lighting a candle in a confined space. This careful adjustment prevents excessive fuel consumption and minimizes soot production.
- Impact on Fuel Consumption
Wick height directly influences fuel consumption. An excessively high wick leads to rapid fuel depletion and increased soot buildup. Conversely, a wick that is too low can be difficult to ignite and may produce an insufficient flame. Optimal wick height balances flame performance with fuel efficiency. This consideration is particularly relevant for users who rely on their lighter frequently, as proper wick adjustment can significantly extend the time between refills.
- Soot Production and Cleanliness
Wick height influences the completeness of fuel combustion. A high wick can result in incomplete burning, leading to excessive soot formation. This soot can clog the lighter’s mechanism, affecting performance and requiring more frequent cleaning. Proper wick adjustment minimizes soot production, preserving the lighter’s internal components and ensuring a cleaner burn. This, in turn, extends the lifespan of the lighter and reduces maintenance requirements.
- Tool Usage and Precision
The process of raising or lowering the wick requires precision and the correct tools, such as tweezers or needle-nose pliers. These tools provide the necessary grip and control to avoid damaging the delicate wick fibers. Attempting to adjust the wick without the appropriate tools can lead to fraying, bending, or even breakage, compromising the lighter’s functionality. Proper tool usage ensures precise adjustments, preserving the wick’s integrity and facilitating optimal lighter performance.
The seemingly simple act of gently raising or lowering the wick is integral to optimizing a Zippo lighter’s performance. Understanding the interplay between wick height, flame characteristics, and fuel efficiency is essential for maintaining a reliable and long-lasting flame. Mastering this adjustment ensures consistent performance and extends the lifespan of the lighter, showcasing the importance of this seemingly minor detail in the overall functionality of a Zippo lighter.
4. Trim charred or frayed wick
Trimming a charred or frayed wick is an integral component of Zippo lighter maintenance and directly impacts the overall process of wick adjustment. A charred wick, a result of repeated use, inhibits proper fuel absorption and can lead to an uneven, inefficient flame. Fraying, often caused by improper adjustments or contact with the flint wheel, similarly disrupts the flame pattern and can lead to difficulties in ignition. Addressing these issues through trimming is essential for optimizing lighter function.
Consider a scenario where a lighter exhibits a weak, flickering flame despite adequate fuel. Examination reveals a blackened, charred wick. Trimming the charred portion exposes fresh wick material, restoring proper fuel flow and resulting in a stronger, more consistent flame. Similarly, a frayed wick, identified by its split or uneven tip, can cause the flame to burn unevenly or even extinguish prematurely. Trimming the frayed ends restores a uniform wick structure, promoting a clean and stable flame.
The practical significance of trimming a charred or frayed wick extends beyond simply improving the immediate flame quality. This practice also contributes to the longevity of the lighter. A damaged wick can impede the proper function of the flint wheel mechanism, potentially leading to misfires or requiring excessive force. Trimming eliminates this interference, ensuring smoother operation and reducing wear on the flint wheel. Regular trimming, in conjunction with proper wick height adjustment, optimizes fuel consumption, reduces soot buildup, and contributes to a cleaner, more reliable burn. Therefore, understanding the importance and proper execution of wick trimming is fundamental to mastering the art of Zippo lighter maintenance.
5. Test Flame Height
Evaluating flame height is integral to the process of wick adjustment on a Zippo lighter. It serves as the primary feedback mechanism, allowing confirmation of whether the adjustment has achieved the desired outcome. This iterative process of adjustment and testing ensures optimal lighter performance, balancing flame size with fuel efficiency and minimizing undesirable soot production.
- Visual Inspection
Visual observation of the flame provides immediate feedback on wick height. A flame that is too high appears tall and unsteady, potentially producing excessive soot. Conversely, a flame that is too low struggles to maintain itself and may extinguish easily. The ideal flame height typically falls within a specific range, providing sufficient illumination without excessive fuel consumption.
- Functional Testing
Beyond visual assessment, functional testing verifies the flame’s practicality. Lighting a cigarette or candle serves as a practical test, confirming the flame’s ability to ignite other materials effectively. This practical application reinforces the visual assessment and ensures the flame serves its intended purpose.
- Wind Resistance
Testing flame behavior in various conditions, such as exposure to wind, assesses its resilience. A properly adjusted wick maintains a stable flame even in mildly windy conditions. This resilience is crucial for reliable performance in outdoor environments. Testing in different conditions ensures the adjusted wick height meets practical needs.
- Fuel Efficiency Observation
Monitoring fuel consumption after wick adjustment provides insight into long-term efficiency. A properly adjusted wick maximizes burn time while minimizing waste. This observation confirms the effectiveness of the adjustment in optimizing fuel usage.
Testing flame height after each wick adjustment forms a crucial feedback loop, guiding the user towards optimal lighter performance. This iterative process, combining visual inspection with functional testing, ensures a consistent and reliable flame while minimizing fuel consumption. By carefully observing and responding to the flame’s behavior, users achieve a balance between functionality and efficiency, maximizing the lifespan and performance of their Zippo lighter.
6. Reinsert Carefully
The final step in the wick adjustment process, reinserting the Zippo lighter’s internal unit into its casing, demands careful execution. This seemingly simple action holds significant weight in the overall success of the adjustment. Improper reinsertion can negate the meticulous work of wick manipulation, leading to functional issues and potentially damaging the lighter’s components. The “reinsert carefully” stage represents the culmination of the wick adjustment process and directly influences the lighter’s subsequent performance. A misaligned insert can impinge on the wick, affecting flame height and stability. It can also interfere with the flint wheel mechanism, leading to ignition problems. Furthermore, forcing the insert can damage the delicate internal components, affecting the lighter’s longevity.
Consider a scenario where the wick has been perfectly adjusted to produce an optimal flame. However, during reinsertion, the insert is forced into the casing at an angle. This misalignment can compress the wick, negating the prior adjustments and resulting in a low or uneven flame. Alternatively, if the insert is not fully seated, the lighter may not close properly, leaving it susceptible to fuel evaporation and accidental ignition. Another potential issue arises if the cam, which interacts with the flint wheel, is not properly aligned during reinsertion. This misalignment can prevent the flint from striking the flint wheel effectively, hindering spark generation and preventing the lighter from igniting. These examples highlight the practical significance of careful reinsertion in preserving the adjusted wick position and ensuring proper lighter functionality.
The act of reinserting the unit concludes the wick adjustment process and directly influences the lighter’s operational integrity. Careful execution ensures the adjusted wick height remains unaffected, the flint wheel mechanism operates smoothly, and the lighter casing closes securely. This meticulous approach safeguards the lighter’s components, preserving its functionality and longevity. Therefore, understanding the importance of proper reinsertion, the potential consequences of misalignment, and the practical techniques for achieving a secure fit is crucial for successful Zippo lighter maintenance and achieving optimal, long-lasting performance. The careful reinsertion of the unit represents not merely the final step, but an essential component of the entire wick adjustment process, contributing significantly to the lighter’s overall functionality and lifespan.
Frequently Asked Questions
This section addresses common queries regarding Zippo wick adjustment, offering practical solutions and clarifying potential misconceptions. Understanding these aspects ensures optimal lighter performance and longevity.
Question 1: What tools are recommended for adjusting a Zippo wick?
Precision tools like tweezers or needle-nose pliers are recommended for manipulating the wick. These tools offer the necessary control and grip to avoid damage.
Question 2: How often should wick adjustment be performed?
Wick adjustment frequency depends on usage. When the flame becomes too high, too low, or uneven, adjustment is necessary. Regular inspection helps determine the appropriate timing.
Question 3: Can one adjust the wick without removing the insert?
Attempting wick adjustment without removing the insert is strongly discouraged. This practice risks damage to the wick, flint mechanism, and other internal components. Insert removal is essential for proper access and safe manipulation.
Question 4: What indicates a need for wick trimming?
A charred, blackened wick or a frayed, uneven wick tip necessitates trimming. These conditions impede fuel flow and disrupt the flame pattern, requiring corrective trimming.
Question 5: How does wick height affect fuel consumption?
Wick height directly correlates with fuel consumption. A higher wick results in increased fuel usage, while a lower wick conserves fuel. Finding the optimal height balances flame performance with fuel efficiency.
Question 6: What happens if the insert is not reinserted correctly?
Improper reinsertion can compromise wick adjustments, interfere with the flint wheel mechanism, and potentially damage internal components. Careful reinsertion is crucial for proper lighter function and longevity.
Proper wick maintenance, including adjustment and trimming, is crucial for optimal Zippo lighter performance. Understanding these common queries and their solutions ensures reliable ignition and extends the lighter’s lifespan.
For further maintenance guidance, consult the official Zippo website or authorized service centers for expert assistance and detailed instructions.
Conclusion
Proper wick adjustment is essential for reliable Zippo lighter function. From initial insert removal to final reinsertion, each step plays a crucial role in achieving optimal flame height, fuel efficiency, and longevity. Utilizing appropriate tools, such as tweezers or needle-nose pliers, ensures precise wick manipulation, while careful observation and testing confirm desired results. Trimming a charred or frayed wick further enhances performance and extends the lighter’s lifespan. Understanding the interplay between wick height, flame characteristics, and fuel consumption empowers users to maintain their lighters effectively.
Mastery of wick adjustment ensures consistent ignition and contributes significantly to the enduring legacy of the Zippo lighter as a dependable and refillable tool. Through diligent maintenance and a thorough understanding of its mechanics, a Zippo lighter can provide years of reliable service. This seemingly minor adjustment underscores the importance of proper care in maximizing the lifespan and performance of this iconic device.


