Replacing a worn wick in a Zippo lighter restores its functionality, ensuring a reliable flame. This process involves removing the old wick, inserting a new one through the chimney, and trimming it to the correct length. A properly installed wick draws fuel from the cotton packing to the flint wheel, enabling ignition.
Maintaining a fresh wick is crucial for optimal lighter performance. A deteriorated wick can lead to difficulty lighting, a weak flame, or excessive fuel consumption. Since the development of the Zippo lighter in the 1930s, wick replacement has been an essential aspect of its longevity and repairability, contributing to the brand’s iconic status.
The following sections detail the necessary tools, materials, and steps involved in achieving a successful wick replacement, ensuring the continued reliable operation of the lighter.
Tips for Zippo Wick Replacement
Careful execution of the wick replacement process ensures optimal lighter function and longevity. The following tips facilitate a smooth and successful outcome.
Tip 1: Gather Necessary Materials. Before beginning, assemble a fresh Zippo wick, small pliers or tweezers, and a small flathead screwdriver. Having these items readily available streamlines the process.
Tip 2: Work in a Well-Lit Area. Adequate lighting is essential for clear visibility of the lighter’s internal components, ensuring accurate wick placement and trimming.
Tip 3: Remove the Insert. The insert must be extracted from the lighter casing before proceeding with wick replacement. This provides access to the necessary components.
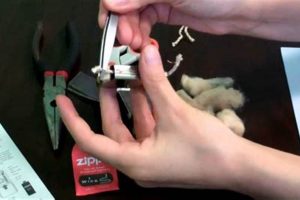
Tip 4: Unravel the Old Wick. Using the pliers or tweezers, carefully unravel the old wick from the rayon balls within the lighter’s fuel chamber. Discard the old wick appropriately.
Tip 5: Thread the New Wick. Insert the new wick through the chimney and down into the fuel chamber, ensuring it weaves through the rayon balls. Use the screwdriver to gently guide the wick if necessary.
Tip 6: Trim the Wick. Once threaded, trim the wick so it extends slightly above the chimney. Avoid excessive length, which can impede proper closing of the lid.
Tip 7: Reassemble the Lighter. Return the insert to the casing and test the lighter’s functionality. If necessary, adjust the wick length further to achieve optimal flame height.
Adhering to these tips promotes a successful wick replacement, restoring the lighter to its intended performance and extending its lifespan.
By understanding and implementing the provided information and tips, individuals can maintain their Zippo lighters effectively, ensuring reliable performance for years to come.
1. Remove Insert
Insert removal is fundamental to Zippo wick replacement. The insert, containing the wick, flint wheel, and fuel chamber, must be extracted from the outer casing to access and replace the wick. Without removing the insert, the internal components remain inaccessible, preventing wick replacement. This step initiates the process and is essential for subsequent actions.
Consider a scenario where a Zippo lighter fails to ignite reliably. A worn wick is a likely culprit. However, accessing the wick requires extracting the insert. This action exposes the wick and related components, allowing for examination and replacement. Failure to remove the insert precludes any further maintenance or repair related to the wick. The insert acts as a barrier protecting the internal mechanisms, and its removal is the gateway to servicing those mechanisms.
In conclusion, insert removal is not merely a step but a prerequisite for Zippo wick replacement. Its practical significance lies in granting access to the lighter’s internal workings. Understanding this connection is essential for anyone seeking to maintain or repair a Zippo lighter, highlighting the integrated design and the importance of proper disassembly for effective maintenance.
2. Unravel old wick
Unraveling the old wick is integral to Zippo lighter maintenance and directly precedes new wick installation. The old wick, saturated with fuel and residue, obstructs proper placement of the new wick. Its removal is thus a necessary precursor to ensuring the new wick integrates correctly within the lighter’s mechanism. Without this step, the new wick cannot effectively draw fuel, compromising lighter function. Consider a clogged pipe; attempting to force water through exacerbates the issue. Similarly, installing a new wick over a deteriorated one impedes fuel flow, rendering the lighter unusable. Unraveling the old wick clears the pathway for optimal fuel delivery and sustained ignition.
The practical implications of this process are substantial. A tangled or partially removed old wick inhibits fuel absorption by the new wick, leading to inconsistent flames or failure to ignite. One might encounter this issue when attempting to relight a lighter after extended non-use. If the old wick is not fully removed, the lighter may struggle to ignite despite a fresh wick and ample fuel. This underscores the importance of thorough wick replacement, emphasizing that unraveling the old wick is not merely a step, but a critical component of the process, influencing the lighter’s overall performance.
In conclusion, unraveling the old wick is essential for successful Zippo wick replacement. Its removal ensures unobstructed fuel flow to the new wick, promoting consistent, reliable ignition. Failure to complete this step compromises lighter functionality, highlighting the interconnectedness of each component in the replacement process. Understanding the cause-and-effect relationship between removing the old wick and installing the new one enables effective lighter maintenance and ensures continued functionality.
3. Thread new wick
Threading the new wick is the core process within Zippo lighter wick replacement. This procedure directly influences lighter functionality and necessitates precision. The wick acts as the conduit between the fuel source and the ignition point, making its correct placement paramount for a functioning lighter. This stage builds upon prior stepsremoving the insert and unraveling the old wickand sets the foundation for subsequent trimming and reassembly.
- Wick Material and Structure
Zippo wicks consist of woven fiberglass material designed for capillary action, drawing fuel upwards. This material choice is crucial for consistent fuel delivery to the flint wheel. Understanding the wick’s structure informs how it should be threaded, ensuring optimal fuel flow. For example, attempting to thread a damaged or frayed wick will hinder proper fuel absorption and result in an unreliable flame.
- Navigation Through the Rayon Balls
The wick must be carefully threaded through the rayon balls within the fuel chamber. These balls hold the lighter fluid, and the wick’s placement among them ensures consistent fuel supply. Similar to a plant’s roots drawing water from the soil, the wick, woven through the rayon, absorbs the fuel necessary for ignition. Improper threading, where the wick bypasses a significant portion of the rayon, leads to inefficient fuel consumption and a shorter burn time.
- Placement in Relation to the Chimney
The wick must be positioned correctly within the chimney to ensure proper flame height and prevent fuel leakage. The chimney protects the flame from wind and provides a controlled environment for combustion. Analogy can be drawn to a candle wick; its position within the wax determines the flame size and burn rate. Incorrect wick placement within the Zippo’s chimney can lead to an excessively high flame, rapid fuel depletion, or difficulty igniting.
- Ensuring Sufficient Wick Protrusion
Enough wick must protrude above the chimney to allow for ignition by the flint wheel. This exposed portion is crucial for spark contact and flame initiation. However, excessive protrusion can lead to difficulties closing the lighter and potential fuel evaporation. This balance is vital; similar to adjusting a gas stove’s flame, too little wick exposure prevents ignition, while too much results in an uncontrolled flame.
Threading the new wick effectively connects the preparatory steps with the final stages of Zippo wick replacement. Each facet of the threading processmaterial selection, rayon ball navigation, chimney placement, and protrusion lengthcontributes to the lighters overall function. Mastery of this stage ensures a consistent flame and efficient fuel consumption, demonstrating the intricate relationship between a seemingly simple procedure and the reliable operation of a classic lighter.
4. Trim wick
Trimming the wick is a crucial final step in Zippo lighter maintenance, directly impacting functionality and longevity. Following the threading of a new wick, proper trimming ensures an optimal flame height and facilitates proper lid closure. This seemingly minor adjustment significantly influences fuel efficiency, flame consistency, and the lighters overall performance. An improperly trimmed wick can lead to various issues, underscoring the importance of this precise action.
- Flame Height Regulation
Wick length directly correlates with flame height. A longer wick produces a larger flame, consuming fuel more rapidly. Conversely, a shorter wick generates a smaller, more controlled flame. Similar to adjusting a gas burner, wick trimming allows for customization based on individual needs. An excessively long wick, akin to an open gas valve, leads to rapid fuel depletion and potential safety hazards.
- Impact on Lid Closure
An overextended wick obstructs proper lid closure, potentially damaging the wick and hindering the lighters protective function. The lid seals the fuel chamber, preventing evaporation and accidental ignition. An improperly trimmed wick compromises this seal, much like a poorly fitted door allows drafts. This can lead to fuel loss, drying out the wick and impacting the lighters ability to ignite reliably.
- Fuel Efficiency and Longevity
Proper wick trimming optimizes fuel consumption. A correctly trimmed wick draws the necessary amount of fuel for a consistent flame without excessive burning. This contributes to the lighters overall lifespan and reduces the frequency of refills. Much like a properly tuned engine maximizes fuel economy, a well-trimmed wick ensures efficient fuel use in a Zippo lighter.
- Flint Wheel Engagement and Spark Creation
The trimmed wicks height influences its interaction with the flint wheel. A correctly trimmed wick ensures optimal contact with the flint, generating the spark necessary for ignition. Insufficient wick protrusion hinders spark generation, while excessive protrusion can impede the flint wheel’s rotation. This balance, similar to the precise gap in a spark plug, is crucial for reliable ignition.
Trimming the wick is not merely a concluding step but an integral component of the Zippo wick replacement process. Its impact on flame height, lid closure, fuel efficiency, and flint wheel engagement demonstrates its significance in maintaining optimal lighter function. Understanding the interconnectedness of these elements reinforces the importance of precise wick trimming in achieving reliable, long-lasting performance.
5. Reassemble lighter
Reassembling the Zippo lighter correctly after wick replacement is crucial for restoring full functionality and ensuring safe operation. This final step, succeeding wick trimming, directly impacts the lighter’s performance and longevity. Reassembly is not merely a reversal of disassembly; it is a critical process that integrates the new wick into the lighter’s mechanism, allowing the component to function as intended. Failure to correctly reassemble the lighter can negate the benefits of a new wick, leading to malfunctions, fuel leaks, or ignition failures.
Consider the analogy of a clock; replacing a gear without proper reassembly renders the clock inoperable. Similarly, a new wick, even if correctly installed, cannot function if the lighter is not properly reassembled. The insert must be securely placed within the casing, ensuring that all components align correctly. For instance, an improperly seated insert can prevent the lid from closing completely, leading to fuel evaporation and potential safety hazards. Moreover, the flint wheel mechanism must engage correctly with the wick for reliable spark generation. Failure to align these components during reassembly can result in ignition problems, rendering the lighter unusable despite a new wick.
The practical significance of proper reassembly lies in ensuring the new wick’s integration into the lighter’s overall operation. A correctly reassembled lighter provides consistent ignition, controlled flame height, and efficient fuel consumption. This reinforces the interconnectedness of the wick replacement process, emphasizing that each step, from initial disassembly to final reassembly, contributes to the lighter’s functionality. Difficulties encountered after reassembly, such as fuel leaks or inconsistent flames, often indicate errors during this stage. Understanding the importance of correct reassembly, therefore, allows for effective troubleshooting and promotes long-term lighter reliability. This attention to detail ensures the lighter performs as intended, highlighting the practical impact of careful execution in even seemingly simple mechanical processes.
6. Test Functionality
Testing functionality after Zippo wick replacement is the critical final step, validating the entire process and ensuring the lighter operates as intended. This diagnostic procedure confirms the new wick’s proper integration with the lighter’s mechanism, providing immediate feedback on the success of the replacement. Testing functionality is not merely a recommendation but a necessary measure to ensure reliable and safe operation. Ignoring this step risks undetected malfunctions, potentially leading to fuel leaks, inconsistent flames, or ignition failures.
- Ignition Verification
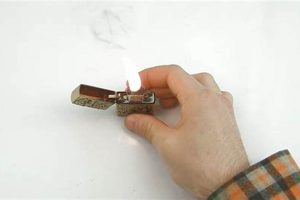
The primary test involves attempting to ignite the lighter. Successful ignition confirms the flint wheel engages correctly with the newly installed wick, generating the necessary spark. Failure to ignite suggests potential issues such as insufficient wick protrusion, improper flint alignment, or inadequate fuel supply. This initial check, akin to testing a circuit’s continuity, provides immediate feedback on the core functionality.
- Flame Height Observation
Observing the flame’s height and stability assesses wick trimming accuracy and fuel flow. A consistent, appropriately sized flame indicates proper wick length and unobstructed fuel delivery. An erratic or excessively high flame suggests over-trimming or potential issues within the fuel delivery system. Conversely, a low or sputtering flame might indicate under-trimming or inadequate fuel flow. This observation, much like gauging water pressure, provides crucial information about system performance.
- Lid Closure and Fuel Retention Check
Closing the lid and checking for fuel leaks assesses the integrity of the seal and confirms proper insert placement. A secure closure prevents fuel evaporation and minimizes the risk of accidental ignition. Leakage suggests an improperly seated insert or damage to the sealing mechanism. This step, similar to inspecting a valve for leaks, ensures safe and efficient fuel containment.
- Extended Burn Test (Optional)
An extended burn test, though not always necessary, can reveal subtle issues with fuel flow or wick performance. Maintaining a consistent flame over a short period confirms sustained fuel delivery and wick saturation. Flickering or diminishing flame during this test might indicate inconsistent fuel flow or an improperly threaded wick. This extended observation, akin to a stress test in engineering, provides deeper insights into long-term performance.
Testing functionality serves as the final validation of the entire wick replacement process. Each testignition, flame observation, lid closure, and extended burnprovides specific insights into the lighter’s operation, ensuring the new wick functions correctly and the lighter operates safely and reliably. This holistic approach underscores the interconnectedness of the replacement process, emphasizing that successful lighter maintenance relies on meticulous execution and comprehensive testing.
Frequently Asked Questions
This section addresses common inquiries regarding Zippo wick replacement, providing concise and informative responses to facilitate successful lighter maintenance.
Question 1: What type of wick is required for a Zippo lighter?
Authentic Zippo wicks are recommended for optimal performance and compatibility. Using generic wicks may compromise the lighter’s function.
Question 2: How often should the wick be replaced?
Wick replacement frequency depends on usage. A general guideline is to replace the wick when the lighter becomes difficult to ignite, exhibits a weak flame, or consumes fuel excessively.
Question 3: Can any type of tweezers or pliers be used for wick removal?
Small, fine-tipped tweezers or pliers are ideal for manipulating the wick without damaging internal components. Avoid using tools that may scratch or deform the lighter’s insert.
Question 4: Is it necessary to replace the rayon balls during wick replacement?
Rayon ball replacement is generally not required unless they are significantly damaged or deteriorated. However, if the rayon appears excessively compressed or contaminated, replacement may improve fuel retention and wick performance.
Question 5: What indicates a correctly trimmed wick?
A correctly trimmed wick extends slightly above the chimney, allowing for ignition while not hindering lid closure. The flame should be consistent and of moderate height. Adjustments can be made based on individual preference and usage conditions.
Question 6: What should be done if the lighter still malfunctions after wick replacement?
If the lighter continues to malfunction after wick replacement, other factors may be contributing to the issue. Inspect the flint, ensure adequate fuel levels, and check for any obstructions within the lighter’s mechanism. If problems persist, consult Zippo’s official resources or contact customer support for further assistance.
Understanding these common inquiries and their corresponding answers empowers individuals to perform wick replacements effectively and troubleshoot potential issues, promoting successful lighter maintenance and ensuring long-term functionality.
The following section offers additional tips and troubleshooting advice for addressing more complex scenarios related to Zippo lighter maintenance and repair.
Conclusion
Proper wick replacement is essential for maintaining a Zippo lighter’s functionality. This process encompasses several key stages: insert removal, old wick unraveling, new wick threading, wick trimming, lighter reassembly, and functionality testing. Each step contributes to the lighter’s overall performance, impacting flame height, fuel efficiency, and reliability. Understanding the intricacies of each stage ensures successful wick replacement and promotes the lighter’s longevity.
Through meticulous execution of these steps, users can extend the lifespan of their Zippo lighters, preserving their reliable operation for years to come. Consistent maintenance, including periodic wick replacement, reinforces the enduring utility of these iconic lighters, underscoring their value as reliable tools and cherished possessions.


