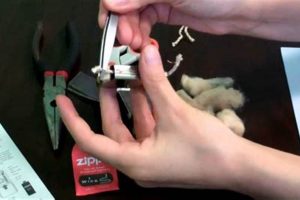
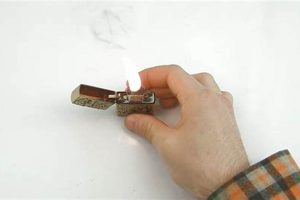
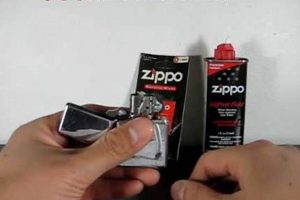
Changing the absorbent fibrous material within a Zippo-style lighter involves removing the insert from the case, lifting the felt pad covering the fuel chamber, and gently pulling the old material out through the bottom of the insert using tweezers or pliers. A new length of the material is then inserted, ensuring it extends slightly above the chimney, before trimming the excess and replacing the felt pad and insert.
Maintaining this component ensures optimal lighter performance. A fresh wick draws fuel efficiently, providing a consistent flame. Over time, the material can become charred and clogged, hindering fuel flow and producing a weak or sputtering flame. Regular replacement, often alongside other maintenance like refilling the fuel and replacing the flint, contributes to the lighter’s longevity and reliability, hallmarks of reusable lighter designs since their popularization in the early 20th century.
The following sections detail the necessary tools, materials, and step-by-step instructions for this straightforward yet crucial maintenance procedure. Clear illustrations will accompany each step to guide users through the process effectively and safely.
Tips for Zippo Wick Replacement
Ensuring proper wick replacement contributes significantly to a Zippo lighter’s longevity and performance. The following tips offer valuable insights for a smooth and successful process.
Tip 1: Employ proper tools. Needle-nose pliers or tweezers offer optimal control for extracting the old wick and inserting the new one. Avoid using sharp or pointed instruments that could damage the lighter’s components.
Tip 2: Use the correct replacement wick. Authentic Zippo wicks are designed for optimal fuel flow and burn performance. Generic replacements may not provide the same reliability.
Tip 3: Exercise caution when handling the rayon balls. These flammable components should be kept away from open flames and disposed of safely.
Tip 4: Ensure the wick extends slightly above the chimney. This allows for proper ignition and flame height adjustment. Trim any excess wick material to prevent excessive flaring.
Tip 5: Pack the wick material loosely within the fuel chamber. Over-packing can restrict fuel flow and hinder lighter performance.
Tip 6: Replace the felt pad carefully, ensuring it sits flush against the wick and fuel chamber. This prevents fuel leakage and ensures optimal lighter operation.
Tip 7: After replacing the insert, test the lighter’s functionality. Observe the flame height and adjust as needed using the flint wheel.
Adhering to these guidelines ensures optimal wick replacement, contributing to a consistently reliable flame and extending the lighter’s lifespan.
By understanding these key elements of Zippo lighter maintenance, one can appreciate the enduring design and functionality of this classic lighter.
1. Access the insert.
Accessing the insert represents the foundational step in replacing a Zippo lighter’s wick. The insert, a self-contained unit holding the fuel chamber, wick, and flint assembly, must be separated from the protective outer casing to perform any maintenance. Without accessing this internal mechanism, wick replacement is impossible. This action initiates the entire process, enabling subsequent steps like removing the old wick and inserting a new one. Consider a car requiring an oil change; one must first open the hood to access the engine compartment before changing the oil. Similarly, accessing the insert provides the necessary entry point for wick replacement.
The insert’s removal involves firmly grasping the lighter’s case and lifting the insert unit out. This process is typically straightforward, requiring minimal force. However, variations in case designs might necessitate slightly different approaches. Examining the lighter’s construction beforehand can prevent unnecessary force and potential damage. Accessing the insert correctly ensures the subsequent steps proceed smoothly, contributing to efficient and effective wick replacement.
Successful wick replacement hinges upon proper access to the insert. This initial action sets the stage for the entire procedure, enabling the necessary manipulations within the lighter’s internal mechanism. Understanding this initial step’s importance contributes to efficient maintenance and ensures the lighter’s continued functionality. Overlooking this fundamental step can lead to frustration and potentially damage the lighter’s components.
2. Remove old wick.
Removing the old wick is integral to the process of replacing a Zippo lighter’s wick. The old wick, often charred and shortened from use, obstructs the insertion of a fresh wick. Its removal is a prerequisite for restoring the lighter’s functionality. This action directly addresses the core issue of a depleted wick, paving the way for improved fuel delivery and a stronger flame. Consider a clogged drainpipe; the obstruction must be cleared before water can flow freely again. Similarly, extracting the spent wick clears the path for the new wick to function correctly. Without this crucial step, the replacement process cannot be completed, and the lighter remains unusable.
The process involves carefully extracting the old wick from the lighter’s insert. Precision is key to avoid damaging internal components. Specialized tools, like tweezers or needle-nose pliers, offer optimal control during extraction. The old wick, typically brittle and fragile, requires delicate handling. Attempting to force the removal can lead to unintended damage and hinder subsequent steps. A methodical approach ensures complete removal without compromising the lighter’s integrity. Just as a surgeon utilizes specialized instruments for delicate procedures, employing appropriate tools ensures precise and efficient wick removal.
Successful wick removal enables subsequent steps in the replacement process. This action sets the stage for inserting a new wick, ultimately restoring the lighter’s functionality. Challenges may arise if the old wick is tightly packed or fragmented. Patience and appropriate tools facilitate a smooth removal, minimizing potential complications. The importance of this step extends beyond the immediate task; it contributes to the overall longevity and performance of the lighter. By understanding the significance of proper wick removal, one can appreciate the interconnectedness of each step in maintaining a Zippo lighter’s optimal operation.
3. Insert new wick.
Inserting a new wick represents the core action in replacing a Zippo lighter’s wick. This pivotal step directly addresses the functional need for a fresh fuel delivery system. Without a new wick, the lighter remains non-operational. This action mirrors replacing a worn-out fan belt in an engine; the new component restores the system’s intended function. The new wick serves as the conduit for fuel, enabling the lighter to produce a flame. Understanding this central role clarifies the importance of proper wick insertion within the broader context of lighter maintenance. Inserting the wick correctly ensures the lighter’s continued functionality, highlighting the direct cause-and-effect relationship between this action and the lighter’s operation.
The process necessitates careful threading of the new wick material through the chimney. Precision ensures the wick sits correctly within the lighter’s mechanism. The wick’s length requires careful consideration; sufficient material must extend above the chimney for ignition, yet excessive length can lead to an unruly flame. This balance mirrors adjusting the carburetor in an engine; proper calibration ensures efficient fuel delivery. Just as an improperly adjusted carburetor can hinder engine performance, an incorrectly inserted wick can impede the lighter’s functionality. Practical considerations, such as the wick’s material and density, also influence performance. Using the correct replacement wick ensures compatibility with the lighter’s design and fuel type. Choosing the appropriate material, like selecting the correct type of wire for an electrical circuit, contributes to optimal functionality and longevity.
Successful wick insertion directly impacts the lighter’s performance and lifespan. A correctly installed wick facilitates reliable ignition and a consistent flame. This step’s significance extends beyond immediate functionality; proper insertion minimizes fuel leakage and prevents damage to other components. Challenges, such as fraying or kinking of the wick during insertion, can be mitigated through careful handling and appropriate tools. Understanding these potential issues and employing preventative measures ensures a smooth process and contributes to the lighter’s overall reliability. By grasping the practical implications of correct wick insertion, one can appreciate its pivotal role in maintaining a functional and long-lasting Zippo lighter.
4. Trim and adjust.
Trimming and adjusting the wick represent essential final steps in the replacement process. These actions directly influence the lighter’s performance and longevity, bridging the gap between a newly inserted wick and a fully functional lighter. Proper trimming and adjustment ensure optimal fuel delivery and flame control, completing the restoration process initiated by the wick replacement.
- Wick Length and Flame Height
The wick’s length directly correlates with the flame’s height. Trimming the wick to the correct length ensures a manageable and efficient flame. Excessive length can lead to an excessively large, sooty flame, while insufficient length can hinder ignition. This relationship mirrors adjusting the wick on a candle; proper trimming ensures a controlled and consistent burn. Just as an improperly trimmed candlewick can produce a smoky or weak flame, an incorrectly trimmed lighter wick compromises performance.
- Preventing Fuel Leakage and Flooding
Proper wick trimming minimizes the risk of fuel leakage and flooding. Excess wick material can saturate the lighter’s interior with fuel, leading to inefficient burning and potential fire hazards. Careful trimming ensures proper fuel containment within the wick, preventing unwanted leakage. This parallels regulating water flow through a valve; controlling the flow prevents overflow and ensures efficient use. Just as an improperly adjusted valve can lead to water wastage, an untrimmed wick can cause fuel leakage and compromise the lighter’s functionality.
- Optimizing Fuel Delivery and Flame Stability
Precise wick trimming contributes to consistent fuel delivery and flame stability. A correctly trimmed wick ensures a steady flow of fuel to the flame, producing a consistent burn. This action aligns with calibrating the fuel injectors in an engine; accurate calibration optimizes fuel delivery for optimal performance. Just as misaligned fuel injectors can lead to rough engine operation, an unevenly trimmed wick can cause an erratic flame.
- Ensuring Proper Lighter Closure and Functionality
Correct wick length ensures the lighter closes properly and functions as intended. Excess wick material can interfere with the closing mechanism, hindering proper operation. Trimming the wick flush with the chimney allows for seamless closure and unobstructed functionality. This resembles ensuring proper alignment of gears in a clock; correct alignment facilitates smooth operation. Just as misaligned gears can disrupt a clock’s timekeeping, an improperly trimmed wick can impair the lighter’s closure and overall functionality.
These facets of trimming and adjusting the wick underscore their significance in the overall wick replacement process. These final adjustments connect the new wick to the lighter’s mechanism, ensuring optimal functionality. These seemingly minor actions contribute significantly to the lighter’s long-term reliability and performance. By understanding the interconnectedness of these steps, one can appreciate the importance of precision and attention to detail in maintaining a Zippo lighter.
5. Reassemble lighter.
Reassembling the lighter constitutes the final stage of wick replacement, signifying the culmination of the entire process. This crucial step transitions the lighter from a disassembled state to a functional one, effectively concluding the maintenance procedure. Reassembly directly follows the insertion, trimming, and adjustment of the new wick. The careful execution of this final step ensures the lighter operates as intended, highlighting the importance of proper reassembly in the overall context of wick replacement.
- Restoring Operational Status
Reassembly restores the lighter to its operational state. This action signifies the completion of the maintenance task, bringing the lighter back to its intended functionality. The process involves returning all components to their correct positions within the lighter casing. Much like completing a puzzle, each piece must fit correctly to achieve the final picture. Just as an incomplete puzzle lacks coherence, an improperly reassembled lighter remains non-functional. Ensuring each component is correctly placed guarantees the lighter operates as designed.
- Securing Internal Components
The reassembly process secures the internal components within the lighter’s protective casing. This safeguarding action protects the wick, flint, and fuel chamber from external elements and damage. The casing acts as a shield, similar to a phone case protecting a mobile device. Just as a phone case prevents damage from drops and impacts, the lighter casing shields internal components from wear and tear. Secure reassembly maintains the integrity of the lighter’s mechanism, contributing to its longevity and reliability. A properly secured casing prevents accidental dislodgement of components, ensuring consistent functionality.
- Ensuring Proper Function and Fuel Containment
Correct reassembly ensures proper function and fuel containment. The process involves aligning the internal components precisely to guarantee seamless operation. The casing, when properly closed, creates a sealed environment that prevents fuel evaporation and leakage. This containment mirrors sealing a container to preserve its contents. Just as a leaky container compromises the preservation of its contents, an improperly assembled lighter risks fuel loss and potential fire hazards. Precise reassembly maintains the integrity of the fuel chamber, preventing leaks and ensuring safe and efficient operation.
- Finalizing the Wick Replacement Process
Reassembling the lighter finalizes the wick replacement process. This conclusive action marks the transition from maintenance to operational readiness. The careful execution of this final step ensures the newly installed wick functions correctly within the reassembled lighter. This parallels tightening the screws after assembling furniture; secure fastening ensures the structural integrity of the finished product. Just as loose screws compromise the stability of furniture, improper reassembly can negate the benefits of a new wick. Thorough and precise reassembly validates the entire wick replacement process, guaranteeing the lighter’s renewed functionality.
These facets of reassembly collectively contribute to the successful completion of the wick replacement process. Reassembling the lighter signifies the culmination of all previous steps, transforming individual actions into a cohesive and functional outcome. The careful execution of this final stage ensures the lighter operates reliably, highlighting its importance in maintaining the lighter’s long-term functionality and safety. By understanding the significance of proper reassembly, one gains a comprehensive appreciation for the intricacies of Zippo lighter maintenance and the interconnectedness of each step in the process.
Frequently Asked Questions about Zippo Wick Replacement
This section addresses common inquiries regarding Zippo wick replacement, providing concise and informative responses to facilitate proper maintenance and ensure optimal lighter functionality.
Question 1: How often should one replace a Zippo wick?
Wick replacement frequency depends on lighter usage. Frequent users might require replacement every few months, while occasional users might find yearly replacement sufficient. A noticeably diminished flame or difficulty igniting indicates a necessary replacement.
Question 2: Can any type of wick be used in a Zippo lighter?
While some generic wicks might fit, authentic Zippo wicks are recommended. These wicks are specifically designed for optimal fuel flow and burn characteristics within Zippo lighters, ensuring reliable performance and longevity.
Question 3: What tools are required for wick replacement?
Tweezers or needle-nose pliers are essential for carefully extracting the old wick and inserting the new one. A small flathead screwdriver can assist in lifting the felt pad covering the fuel chamber.
Question 4: What happens if the wick is not trimmed correctly?
Incorrect wick trimming can lead to several issues. An excessively long wick produces a large, sooty flame and wastes fuel. A wick that is too short might prevent the lighter from igniting reliably.
Question 5: How can one determine if the wick needs replacing?
Several indicators suggest the need for wick replacement: a weak or inconsistent flame, difficulty igniting, or a noticeably blackened and deteriorated wick visible through the chimney.
Question 6: Is professional assistance required for wick replacement?
Wick replacement is a straightforward procedure that most individuals can perform at home. Following provided instructions and utilizing appropriate tools ensures a successful replacement.
Understanding these common inquiries empowers individuals to maintain their Zippo lighters effectively, ensuring reliable performance and extending the lifespan of these classic devices. Proper wick replacement is a simple yet crucial aspect of lighter maintenance.
For further assistance or specific inquiries beyond the scope of these FAQs, consulting official Zippo resources or authorized service centers is recommended.
Replacing a Zippo Lighter Wick
Replacing the wick in a Zippo lighter is a straightforward yet essential maintenance procedure for ensuring optimal performance and longevity. This process involves accessing the lighter insert, carefully removing the old wick, inserting and trimming a new wick, and reassembling the lighter. Understanding the function of each component, utilizing appropriate tools, and adhering to proper techniques contribute to successful wick replacement. Attention to detail during each stage, from initial disassembly to final reassembly, ensures the lighter functions reliably and safely.
Regular maintenance, including wick replacement, preserves the functionality and extends the lifespan of these classic lighters. Through proper care and attention, a Zippo lighter can provide reliable service for years to come, solidifying its enduring legacy as a dependable and iconic piece of functional design.


