Replacing a lighter’s wick involves removing the old, charred wick and inserting a new one, ensuring proper fuel delivery and a consistent flame. This typically requires removing the insert from the lighter casing, pulling out the old wick material, and feeding the replacement wick through the flint tube. Proper wick installation includes trimming the wick to the correct length and ensuring it sits correctly within the lighter’s mechanism.
A fresh wick is essential for optimal lighter function. A worn wick can lead to an uneven flame, difficulty in lighting, and fuel inefficiency. Regular maintenance, including wick replacement, prolongs the life of the lighter and ensures reliable performance. Since the development of the reusable lighter in the early 20th century, replaceable parts like the wick have been key to its longevity and popularity.
The following sections detail the necessary tools, materials, and steps involved in this process, offering a clear and comprehensive guide for successful wick replacement.
Tips for Wick Replacement
Careful execution of the wick replacement process ensures optimal lighter function and longevity. Attention to detail during each step is crucial for success.
Tip 1: Use the proper tools. Needle-nose pliers are recommended for gripping and pulling the old wick. A small flathead screwdriver can be helpful for packing the cotton.
Tip 2: Work in a well-lit area. This provides clear visibility of the lighter’s internal components and facilitates accurate wick placement.
Tip 3: Purchase the correct replacement wick. Using the correct wick size designed for the specific lighter model ensures proper fit and function.
Tip 4: Remove the insert unit from the lighter casing before beginning the process. This allows unobstructed access to the wick and other components.
Tip 5: Do not overfill the lighter with fuel. Overfilling can lead to leaks and fire hazards.
Tip 6: After inserting the new wick, ensure it is adequately fed through the flint tube and sits flush with the bottom of the chimney.
Tip 7: Trim the wick to the correct length after installation. This ensures a clean, even flame and prevents excessive fuel consumption.
Following these tips helps ensure a smooth and successful wick replacement, resulting in a properly functioning lighter.
By understanding the process and paying attention to detail, one can maintain a lighter in optimal working order for years to come.
1. Remove Insert
Insert removal is the foundational step in replacing a Zippo lighter wick. The insert, the internal mechanism containing the wick, flint, and fuel chamber, must be extracted from the outer casing to access and replace the wick. Without removing the insert, the wick is inaccessible, making replacement impossible. This action is akin to removing an engine to access internal components for repair or replacement. A car cannot be serviced without accessing its engine; similarly, a Zippo’s wick cannot be changed without accessing its insert. The insert functions as the core operational unit of the lighter, requiring careful handling during removal and reinstallation.
The insert’s removal process involves a specific technique to prevent damage. While straightforward, improper handling can lead to component misalignment or damage. The bottom of the lighter casing typically features a cam, a small lever that secures the insert. Depressing this cam releases the insert, allowing it to be extracted. Forcing the insert out without releasing the cam can damage both the insert and the casing. Just as a surgeon requires precision and the correct tools for a successful operation, replacing a lighter wick necessitates careful manipulation of the components to avoid damage and ensure proper function after reassembly.
Successful insert removal provides access to the wick and enables subsequent steps in the replacement process. Once the insert is removed, the old wick can be extracted, and the new wick inserted. This initial step is fundamental to the overall process and dictates the success of subsequent actions. The ease of accessing and manipulating the wick directly correlates to the proper removal of the insert. Therefore, understanding and executing this step correctly is crucial for efficient and effective wick replacement, ensuring the lighter’s continued functionality.
2. Extract Old Wick
Extracting the old wick is a critical stage in the process of replacing a Zippo lighter wick. This step directly follows the removal of the insert and precedes the insertion of the new wick. Without complete removal of the old, charred wick material, the new wick cannot be properly installed, hindering the lighter’s functionality. This procedure ensures the fuel delivery system is clear and ready to receive the fresh wick.
- Accessing the Wick
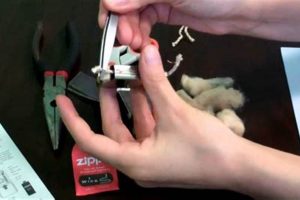
Once the insert is removed, the old wick becomes accessible. It is typically nestled within the cotton packing and threaded through the flint tube. Locating the wick’s end is the first step in its extraction. Similar to removing a damaged wire from a circuit board, careful manipulation is required to avoid disturbing other components. Pulling on exposed fibers without proper identification could damage the cotton packing or dislodge the flint assembly.
- Removal Techniques
Needle-nose pliers are typically recommended for gripping and pulling the old wick. The wick should be grasped firmly but gently to avoid breaking it off inside the lighter. Steady, even pressure is key to successful removal. This process mirrors extracting a deeply embedded splinter; a hasty or forceful approach can exacerbate the situation and lead to further complications. The goal is complete removal, leaving no remnants of the old wick behind.
- Ensuring Complete Removal
Verifying the complete extraction of the old wick is essential before proceeding. Any remaining fragments can obstruct fuel flow to the new wick, leading to an inconsistent flame or ignition failure. This is analogous to clearing a clogged drain; incomplete removal of the obstruction will not resolve the underlying issue. Careful inspection and, if necessary, further extraction ensure a clear pathway for the fuel.
- Preparing for the New Wick
After the old wick is completely removed, the lighter is prepared for the new wick installation. This involves straightening the remaining cotton and ensuring the flint tube is clear for the new wick to be threaded through. Much like preparing a garden bed before planting new seeds, creating a clean and receptive environment is essential for proper function and growth. A clear pathway and correctly positioned cotton ensure optimal fuel flow and consistent ignition.
Successful extraction of the old wick is a pivotal step in the overall wick replacement process. It paves the way for the installation of the new wick and ensures the lighters continued functionality. A thorough and careful approach during this stage significantly impacts the lighters performance and longevity.
3. Insert New Wick
Inserting the new wick is the central action within the broader process of Zippo wick replacement. This step directly follows the old wick’s extraction and is crucial for restoring the lighter’s functionality. The new wick acts as the conduit for fuel delivery to the flint ignition point, making its correct placement essential for reliable operation. Without a new wick properly installed, the lighter remains unusable, much like a vehicle without a functioning fuel line. The wick insertion process necessitates precision and care to ensure proper fuel flow and consistent ignition.
The new wick must be threaded through the flint tube and positioned correctly within the lighter’s mechanism. This involves feeding the wick through the small tube, ensuring it extends sufficiently to reach the fuel chamber while leaving enough material at the top for trimming. The wick’s position influences fuel delivery and flame height. An improperly inserted wick can lead to fuel leaks, inconsistent flame, or failure to ignite. This action can be likened to installing a new pipe in a plumbing system; correct installation ensures proper flow and functionality, while incorrect placement can lead to leaks or blockages.
Correct wick insertion is fundamental to the overall wick replacement process. The success of this stage directly impacts the lighter’s performance and longevity. A properly inserted wick ensures reliable fuel delivery and ignition, restoring the lighter to its intended functionality. Failure to execute this step accurately negates the preceding actions of removing the old wick and preparing the lighter for a new one. This critical stage connects the preparatory steps to the final steps of trimming and repacking, completing the cycle of wick replacement and enabling the lighter’s continued use.
4. Trim Wick
Trimming the wick is an essential final step in the Zippo lighter wick replacement process. It directly influences the lighter’s functionality and flame characteristics. Without proper trimming, the lighter may exhibit an excessively high flame, inefficient fuel consumption, or produce soot. This stage follows the insertion of the new wick and precedes the repacking of the cotton, completing the core procedures of wick replacement.
- Achieving Optimal Flame Height
Trimming establishes the correct flame height. An untrimmed wick can produce a flame that is too high, posing a safety hazard and wasting fuel. Similar to adjusting the height of a lamp wick, the goal is to achieve a flame that provides adequate light and heat without being excessive. Trimming ensures a controlled and efficient burn.
- Preventing Soot and Malfunction
Correct wick trimming minimizes soot production and prevents malfunction. An overly long wick can produce excessive soot, fouling the lighter’s mechanism and hindering performance. Much like a poorly maintained fireplace can produce excessive smoke, an untrimmed wick can lead to a buildup of residue that affects functionality. Trimming ensures clean combustion and prevents clogging.
- The Trimming Process
The trimming process involves using sharp scissors or nail clippers to carefully shorten the exposed wick. The recommended length is typically slightly above the chimney. This ensures sufficient wick exposure for ignition while minimizing the risk of an excessively high flame. Precision is key, much like tailoring a garment to the correct length; accurate trimming ensures optimal performance and aesthetics.
- Final Adjustments and Testing
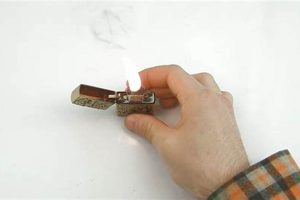
Following trimming, minor adjustments can be made as needed. Testing the lighter’s functionality confirms the success of the trimming process and allows for fine-tuning. This mirrors the calibration of a scientific instrument; precise adjustments ensure accurate and reliable readings. Final adjustments and testing complete the wick replacement process, confirming the lighter’s restored functionality.
Trimming the wick finalizes the core wick replacement procedure, impacting both functionality and safety. A correctly trimmed wick ensures a controlled flame, efficient fuel consumption, and prevents soot buildup, maximizing the lighter’s performance and lifespan. This seemingly minor action plays a significant role in the overall success of the wick replacement process and ensures the lighter’s continued reliable operation.
5. Repack Cotton
Repacking the cotton within a Zippo lighter is an integral component of wick replacement, directly influencing fuel retention and overall lighter performance. While often overlooked, this step is crucial for preventing leaks, ensuring consistent fuel delivery to the wick, and maximizing the lighter’s lifespan. The cotton acts as a reservoir, holding the fuel and facilitating its controlled flow to the wick. Without properly packed cotton, the lighter may leak, experience inconsistent ignition, or deplete fuel rapidly.
- Fuel Retention and Leak Prevention
The primary function of the cotton packing is fuel retention and leak prevention. The absorbent cotton material holds the lighter fluid, preventing it from spilling out of the fuel chamber. Similar to the way an absorbent sponge holds water, the cotton within a Zippo contains the lighter fluid, minimizing evaporation and preventing leaks. Proper repacking ensures a tight seal around the wick and insert, minimizing the risk of fuel escaping and maximizing the time between refills.
- Consistent Fuel Delivery
Repacking the cotton correctly ensures consistent fuel delivery to the wick. The cotton acts as a conduit, drawing fuel from the reservoir and supplying it to the wick. This consistent flow ensures reliable ignition and a steady flame. Analogous to the way a water filtration system delivers clean water to a faucet, the cotton within the Zippo filters and delivers fuel to the wick, ensuring optimal combustion. Proper packing prevents air pockets and ensures even fuel distribution throughout the cotton, promoting consistent performance.
- Lighter Longevity and Performance
Correctly repacked cotton contributes to the longevity and performance of the lighter. By preventing leaks and ensuring consistent fuel delivery, proper packing optimizes fuel efficiency and minimizes wear on the lighter’s components. Much like regular maintenance extends the life of a vehicle, proper cotton repacking maintains the Zippo’s functionality and prolongs its lifespan. This seemingly simple step significantly impacts the lighter’s overall performance and reliability.
- The Repacking Process
The repacking process involves carefully arranging the cotton around the rayon balls and wick, ensuring it fills the fuel chamber without being overly compressed. The goal is to create a snug fit that holds the fuel securely while allowing it to flow freely to the wick. This procedure requires attention to detail and proper technique, ensuring optimal fuel retention and flow. Similar to packing a suitcase efficiently, maximizing space while protecting the contents, repacking the cotton involves maximizing fuel capacity while ensuring proper functionality.
Repacking the cotton is an essential final step in the Zippo wick replacement process. Its proper execution directly affects fuel retention, consistent fuel delivery, and the overall longevity of the lighter. This seemingly minor detail significantly impacts the lighter’s performance and ensures its continued reliable operation, completing the wick replacement process and restoring the lighter to optimal functionality.
Frequently Asked Questions
This section addresses common inquiries regarding Zippo wick replacement, offering concise and informative responses to facilitate a comprehensive understanding of the process.
Question 1: What type of wick is required for a Zippo lighter?
Authentic Zippo wicks are recommended for optimal performance and compatibility. Using generic wicks can negatively impact the lighter’s function.
Question 2: How often should a Zippo wick be replaced?
Wick replacement frequency depends on usage. A general guideline is to replace the wick when the flame becomes inconsistent, difficult to maintain, or produces excessive soot.
Question 3: What tools are necessary for wick replacement?
Needle-nose pliers are recommended for extracting the old wick. A small flathead screwdriver can be helpful for packing the cotton. Sharp scissors or nail clippers are needed for trimming the new wick.
Question 4: Can any type of cotton be used for repacking?
Zippo recommends using their brand of replacement cotton. Generic cotton balls may not provide the same absorbency or performance.
Question 5: Why is my Zippo not lighting after replacing the wick?
Several factors could contribute to ignition failure after wick replacement. These include insufficient fuel, improper wick installation, or issues with the flint or spark wheel mechanism.
Question 6: How can fuel leaks be prevented after wick replacement?
Ensuring the cotton is properly packed around the wick and insert helps prevent fuel leaks. Overfilling the lighter can also lead to leakage.
Understanding these common inquiries and their corresponding solutions ensures successful wick replacement and optimal lighter performance. Proper maintenance and the use of genuine Zippo components contribute to the lighter’s longevity and reliability.
The following section provides visual aids to further clarify the wick replacement process.
Conclusion
Proper wick replacement is essential for maintaining a Zippo lighter’s functionality. This process involves careful removal of the insert, complete extraction of the old wick, precise insertion and trimming of the new wick, and meticulous repacking of the cotton. Each step contributes significantly to the lighter’s performance, fuel efficiency, and lifespan. Neglecting any of these stages can compromise the lighter’s reliability and potentially lead to malfunctions.
Maintaining a Zippo lighter through regular wick replacement ensures its continued reliability and extends its useful life. This straightforward process allows one to preserve the functionality of a classic and dependable tool. Through diligent care and attention to detail, a Zippo lighter can provide dependable service for years to come.


