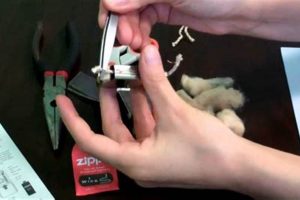
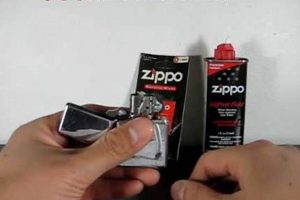
Replacing a Zippo lighter wick involves removing the old wick, inserting a new one through the chimney, and then trimming it to the proper length. Typically, this process requires a small flathead screwdriver or similar tool to access the wick and cotton packing inside the lighter casing. One example is using the screwdriver to gently lift the felt pad covering the packing material, allowing access to the old wick for removal and replacement.
Maintaining a fresh wick is essential for optimal lighter performance. A worn wick can lead to poor fuel absorption, resulting in difficulty lighting or maintaining a flame. Regular wick replacement ensures reliable ignition and prevents fuel leakage. This practice contributes to the longevity of the lighter, upholding its reputation for durability and dependable function. Historically, Zippo lighters have been prized for their simple, repairable design, and changing the wick is a key part of this ongoing maintenance.
The following sections detail the necessary tools, materials, and step-by-step instructions for this essential maintenance procedure, outlining best practices and common troubleshooting tips for a successful wick replacement.
Tips for Zippo Wick Replacement
Proper wick replacement ensures optimal lighter function. These tips offer guidance for a smooth and successful process.
Tip 1: Gather Necessary Materials. Have a new Zippo wick, a small flathead screwdriver, and tweezers or needle-nose pliers readily available before beginning. This preparation streamlines the process.
Tip 2: Work on a Clean Surface. A clean, well-lit workspace prevents the loss of small parts and allows for clear visibility during the procedure.
Tip 3: Exercise Caution with the Felt Pad. Lift the felt pad gently to avoid tearing or damage. Preserve the pad’s integrity for proper lighter function.
Tip 4: Remove the Old Wick Completely. Ensure all remnants of the old wick are removed from the lighter before inserting the new one. This prevents fuel flow issues.
Tip 5: Thread the New Wick Carefully. Guide the new wick through the chimney, ensuring it sits flush within the lighter insert. Proper placement is crucial for consistent flame height.
Tip 6: Trim the Wick Correctly. Trim the wick to the appropriate length, leaving just enough exposed above the chimney for ignition. This prevents excessive flaring and sooting.
Tip 7: Repack the Cotton Evenly. Distribute the cotton packing material evenly around the new wick to ensure consistent fuel absorption.
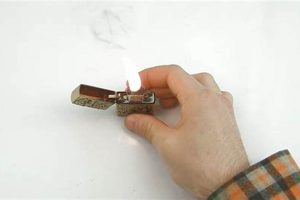
Tip 8: Test the Lighter. After reassembly, test the lighter to ensure proper function. Observe the flame height and adjust the wick if necessary.
Adhering to these tips promotes efficient wick replacement and helps maintain optimal lighter performance, ensuring reliable ignition and a long lifespan for the Zippo lighter.
By following these steps and tips, one can confidently maintain their Zippo lighter for years to come.
1. Access the wick compartment.
Accessing the wick compartment is the foundational step in replacing a Zippo lighter wick. Without proper access, the old wick cannot be removed, and the new one cannot be installed. This stage sets the groundwork for the entire replacement procedure and requires careful execution to avoid damaging the lighter components.
- Identifying the Felt Pad
The wick compartment is located beneath a felt pad covering the lighter insert. This pad acts as a barrier, retaining the cotton packing and wick while allowing fuel to saturate the wick. Locating and carefully lifting this pad is the initial step in accessing the compartment. Using a small flathead screwdriver or similar tool, the edge of the felt pad is gently lifted, exposing the cotton packing material and the top of the wick.
- Lifting the Felt Pad
The felt pad should be lifted with minimal force to prevent tearing or damage. Excessive force can compromise the pads ability to retain the packing material, leading to potential fuel leaks or inconsistent burning. The pad should be lifted just enough to allow access to the wick and packing material. Using a small flathead screwdriver to gently pry the pad is an effective method.
- Exposing the Wick and Packing
Once the felt pad is lifted, the cotton packing material and the top of the wick become visible. This allows for the removal of the old wick and the subsequent insertion of the new wick. The packing material is typically white and fluffy, surrounding the wick. The wick itself is a woven material that absorbs and carries the lighter fluid to the flame.
- Preserving the Insert
While accessing the wick compartment, care must be taken not to damage the lighter insert itself. The insert houses the wick, flint, and other essential components. Avoid applying excessive pressure or using sharp tools that could scratch or deform the insert. Maintaining the integrity of the insert is crucial for proper lighter function.
Successfully accessing the wick compartment enables the subsequent steps of wick replacement. This careful initial procedure is fundamental to achieving proper lighter function and ensures the longevity of the Zippo mechanism.
2. Remove the old wick.
Removing the old wick is a crucial step in the process of replacing a Zippo lighter wick. It directly precedes the installation of the new wick and is essential for proper lighter function. Without removing the old wick, the new wick cannot be correctly positioned and will not draw fuel effectively. This can result in difficulty lighting, a weak flame, or no flame at all. Consider a clogged pipe; until the blockage is removed, flow cannot resume. Similarly, the old wick must be removed to allow the new wick to function correctly.
Practical examples illustrate the importance of this step. A worn wick, often blackened and brittle, loses its ability to absorb and transport fuel efficiently. Leaving remnants of the old wick can obstruct the new wick’s fuel flow, hindering performance. Furthermore, a partially removed wick can become entangled with the new wick, creating a tangled mess that prevents proper insertion and operation. One might imagine trying to thread a needle with a knotted thread; the process is impeded until the knot is untangled. Removing the old wick entirely clears the path for the new wick, ensuring smooth operation.
Complete removal of the old wick, therefore, is not merely a procedural step but a fundamental requirement for successful wick replacement. This action ensures the new wick can properly absorb fuel, enabling reliable ignition and a consistent flame. Challenges may arise if the old wick is brittle or difficult to grasp. However, careful use of tweezers or needle-nose pliers facilitates complete removal, paving the way for optimal lighter performance following the installation of the new wick.
3. Insert the new wick.
Inserting the new wick is the core action within the procedure of replacing a Zippo lighter wick. This action directly addresses the fundamental purpose of the overall process: restoring the lighter’s functionality by establishing a fresh fuel delivery system. The relationship is one of direct cause and effect; inserting the new wick is the cause that leads to the effect of a functioning lighter. Without a new wick properly in place, the lighter remains unusable, highlighting the critical nature of this specific step. Consider a vehicle requiring a new fuel pump; without its installation, the engine cannot receive fuel and remains inoperable. Similarly, a Zippo lighter cannot function without a correctly inserted wick to deliver fuel to the flint and ignite.
Practical applications underscore this connection. A correctly inserted wick ensures proper fuel flow from the lighter’s reservoir to the ignition point. This allows the lighter to produce a consistent flame when operated. Conversely, an improperly inserted wick can lead to several issues. If the wick is not threaded fully through the chimney, fuel delivery is restricted, resulting in a weak flame or no flame at all. Similarly, if the wick is twisted or kinked during insertion, it can impede fuel flow and cause inconsistent burning. One might visualize a bent straw; it restricts liquid flow until straightened. The wick, serving as the fuel conduit, requires correct insertion to function as intended.
Proper insertion, therefore, is paramount to the success of the wick replacement process. It represents the pivotal action that re-establishes the lighter’s core functionality. The challenges lie in carefully threading the wick through the chimney and ensuring it lies straight and untwisted within the lighter casing. Overcoming these challenges, however, directly contributes to the desired outcome: a reliably functioning Zippo lighter.
4. Trim the wick.
Trimming the wick is an integral component of replacing a Zippo lighter wick, directly influencing the lighter’s functionality. This seemingly minor action plays a significant role in regulating flame height and ensuring optimal fuel burn. Cause and effect are clearly linked; the length of the wick directly determines the flame size. An excessively long wick produces a large, unruly flame, while a wick that is too short may not ignite at all. This relationship underscores the importance of trimming the wick as a critical step in the replacement process.
Real-world examples further illustrate this connection. Consider a candle wick; if left untrimmed, it produces a large, sooty flame. Trimming the wick results in a cleaner, more controlled burn. The same principle applies to a Zippo lighter. A properly trimmed wick ensures a consistent flame height, preventing excessive fuel consumption and minimizing soot buildup. Moreover, a correctly trimmed wick reduces the risk of the flame catching nearby materials, enhancing safety. Practical applications include adjusting the flame height based on individual needs, such as lighting a cigarette versus igniting a campfire starter.
Proper wick trimming, therefore, is not merely a cosmetic procedure but a functional necessity. It represents a critical adjustment that optimizes the lighter’s performance and safety. Challenges may include determining the ideal wick length and achieving a clean cut. However, mastering this step ensures a reliable and controlled flame, maximizing the lifespan of the lighter and enhancing user experience.
5. Repack the cotton.
Repacking the cotton is the final, yet crucial step in replacing a Zippo lighter wick. This seemingly simple action plays a significant role in the lighter’s overall functionality, directly impacting fuel retention and delivery to the newly installed wick. Without proper cotton repacking, the lighter may leak fuel, experience inconsistent burning, or fail to ignite altogether. This highlights the essential connection between repacking the cotton and the overall success of the wick replacement process.
- Fuel Retention and Delivery
The primary function of the cotton packing is to hold lighter fluid and ensure a consistent supply to the wick. Repacking the cotton correctly creates a reservoir that holds the fuel securely within the lighter casing while allowing the wick to draw fuel efficiently. This functions similarly to a sponge holding water; the sponge retains the water while allowing it to be absorbed and released as needed. In the context of a Zippo lighter, the cotton acts as the sponge, holding fuel and supplying it to the wick for ignition. Improper repacking can lead to uneven fuel distribution, resulting in dry spots that hinder wick saturation and prevent reliable ignition.
- Preventing Leaks and Dry Hits
Correct cotton repacking also plays a vital role in preventing fuel leaks. The tightly packed cotton acts as a seal, preventing fuel from escaping the lighter casing. This is particularly important for maintaining the lighter’s longevity and preventing fuel stains on clothing or other surfaces. Furthermore, proper repacking mitigates the occurrence of “dry hits,” which occur when the wick is not adequately saturated with fuel. This ensures a consistent flame and prevents the frustration of repeated attempts to ignite the lighter.
- Maintaining Lighter Integrity
The cotton packing also provides structural support within the lighter casing, cushioning the insert and protecting it from damage. Repacking the cotton correctly maintains the integrity of the lighter, preventing rattling or shifting of the insert, which could interfere with proper function. This support is essential for ensuring the long-term reliability and durability of the Zippo lighter.
- Optimizing Wick Performance
The way the cotton is repacked directly impacts the performance of the new wick. Evenly distributing the cotton around the wick ensures consistent fuel flow and prevents localized dry spots. This maximizes the wick’s ability to absorb fuel, leading to reliable ignition and a consistent flame. If the cotton is packed too tightly, it can restrict fuel flow to the wick, resulting in a weak flame. Conversely, loosely packed cotton may not provide adequate fuel retention, leading to dry hits or leaks.
In conclusion, repacking the cotton is not merely a concluding step but an integral part of the wick replacement process. It directly influences fuel retention, leak prevention, lighter integrity, and wick performance, ultimately determining the success of the entire operation and ensuring the Zippo lighter functions as intended.
Frequently Asked Questions
This section addresses common inquiries regarding Zippo wick replacement, offering clarity and guidance for ensuring successful maintenance.
Question 1: How often should a Zippo wick be replaced?
Wick replacement frequency depends on lighter usage. Generally, replacement is recommended when the flame becomes inconsistent, difficult to maintain, or produces excessive soot. A visibly frayed or blackened wick also indicates a need for replacement.
Question 2: Can any type of wick be used in a Zippo lighter?
Genuine Zippo wicks are recommended for optimal performance. While other wicks might fit, they may not absorb fuel correctly, potentially leading to malfunctions or damage.
Question 3: What tools are necessary for wick replacement?
A small flathead screwdriver or similar tool is typically sufficient for accessing the wick compartment and repacking the cotton. Tweezers or needle-nose pliers can be helpful for removing the old wick.
Question 4: What happens if the wick is not trimmed correctly?
An improperly trimmed wick can result in an excessively large flame, excessive fuel consumption, or difficulty igniting. It can also pose a safety hazard due to the potential for unintended ignition of nearby materials.
Question 5: How can one ensure the cotton is repacked correctly?
The cotton should be packed firmly but not overly tight, ensuring even distribution around the wick. This allows for consistent fuel flow to the wick while preventing leaks and maintaining lighter integrity.
Question 6: Where can replacement wicks be purchased?
Genuine Zippo wicks are available through authorized retailers, including tobacco shops, convenience stores, and online marketplaces.
Proper wick replacement is a straightforward yet crucial aspect of Zippo lighter maintenance. Understanding the process and addressing common concerns ensures continued reliable performance.
For further assistance or specific inquiries, consulting official Zippo resources or contacting customer support is recommended.
Conclusion
Replacing a Zippo wick is a straightforward process involving accessing the wick compartment, removing the old wick, inserting and trimming the new wick, and repacking the cotton. Each step contributes significantly to the lighter’s performance, impacting fuel delivery, flame consistency, and overall longevity. Careful execution of these steps, using appropriate tools and genuine Zippo wicks, ensures reliable and continued function.
Maintaining a Zippo lighter through regular wick replacement is a small investment of time that yields significant returns in performance and lifespan. This simple act of maintenance preserves the lighter’s functionality, upholding its legacy of reliability and enduring utility.


